[Blender] アドオン"Tesselate texture plane"を手動でインストールする
概要
オープンソースのBlenderアドオンであるTesselate texture planeのインストール方法についてまとめます。
事前知識なしでも読めるように適宜補足を入れています。
実行環境
- Blender:
2.92.0(Python:3.7.7, pip:21.3.1)- 記事執筆時点でアドオンのサポートバージョンが
v2.92以前とされているため
- 記事執筆時点でアドオンのサポートバージョンが
- Windows 11 Home:
21H2- 動作確認はWindows 11ですが、Windows 10でも同様の方法で対処可能だと思います
- 筆者は表示言語を英語に設定しているため、メニューの名前などは適宜読替えをお願いします
- Tesselate texture plane:
1.1.0- commit:
9eec5d8e3a9f04e2be70dd5495d4c87c09c4797d
- commit:
準備
- Tesselate texture planeをダウンロードする(添付画像内、緑ラインのリンクから)
- GitHub
- zip形式のファイルですが、解凍する必要はありません
- v2.92以前のBlenderをダウンロードする
- Index of release
- プラグインがサポートしているバージョンに注意(添付画像内、オレンジラインのリンクから)
- 使用しているBlenderのバージョンが指定バージョンより新しい場合も、zip版のBlenderをダウンロードすることで共存・使い分けができます
- 本記事にて使用したバージョン:
/release/Blender2.92

OpenCV, Triangle モジュールのインストール
BlenderはPythonと呼ばれるプログラミング言語によって記述されており、そのプラグインであるTesselate texture planeも同様にPythonで記述されています。
はじめに、Tesselate texture planeが依存しているモジュール(OpenCV, Triangle)をインストールします。
※モジュールが何かわからない、という方はひとまず”Python自体の拡張機能”と考えてください
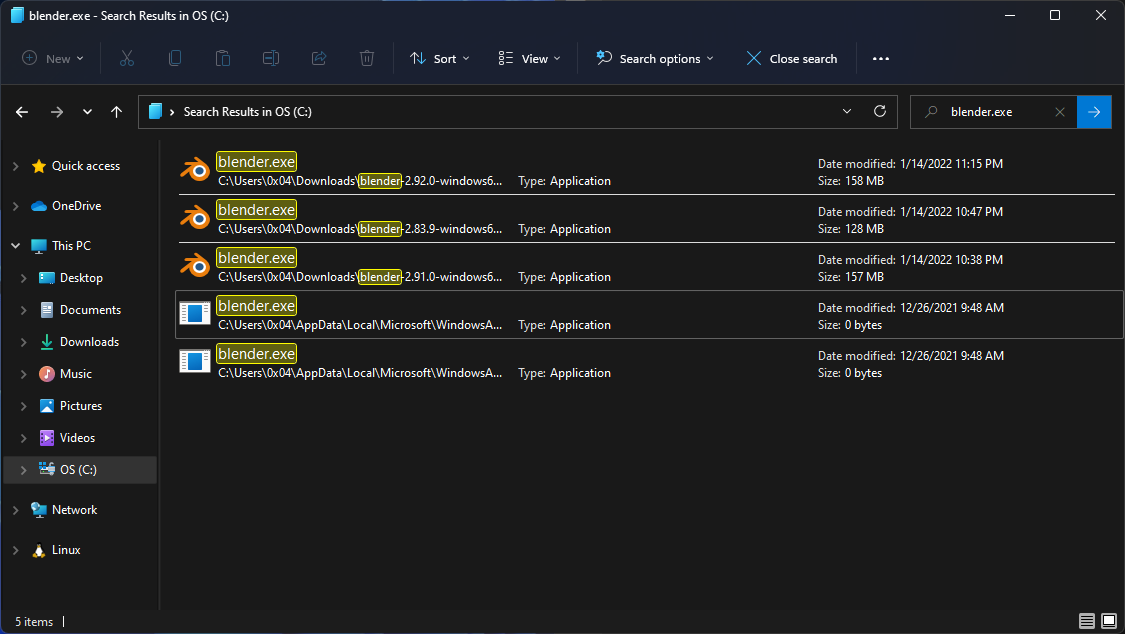
1. Blenderがインストールされているディレクトリパスの確認
- Blenderがインストールされているディレクトリ(フォルダ)を探す
- アドオンを実行するバージョンの
blender.exeが保存されているディレクトリを探す - エクスプローラーでインストール先のディスクを選択し、検索ボックスに
blender.exeと入れると検索できます- ディスク内のファイルを順番に確認していくため検索にはある程度の時間がかかります
- アドオンを実行するバージョンの
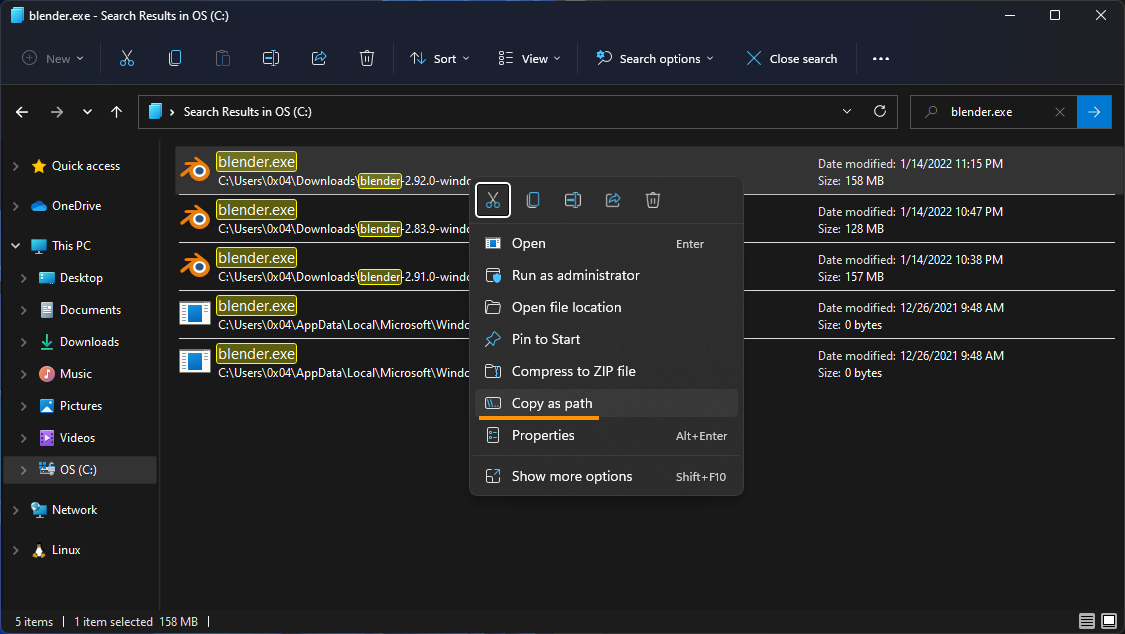
- パス(Path)を確認する
blender.exeをShiftキーを押しながらクリックし、Copy as PathをクリックすることでクリップボードにPathを保存できます
2. PowerShellの起動
- Windowsキーをプッシュ
PowerShellと入力Run as Administratorをクリックして実行

3. Python実行ファイルの確認
BlenderにはPythonとpip(次の手順で使用)が内包されており、それを用いてモジュールをインストールします。
※新たにPythonやpipをインストールする必要はありません。
Blenderに内包されているPythonのPathは次のとおりです。
<blender.exeのPath>\<version>\python\bin\python.exe
--- --- ---
<blender.exeのPath> : 手順1で確認したPathから"blender.exe"を省いたもの
<version> : Blenderのバージョン
また、ここで確認したPathは以降の説明で(snip)\python.exeと省略して表記するためコマンドを実行する際には適宜読替えをお願いします。
3. pipのアップデート
Pythonモジュールのインストールにはpipと呼ばれるパッケージインストーラを使用します。 まずはpipが使用できるかを確認したいので、次のコマンドをPowerShellで実行してください。
(snip)\python.exe -m pip --version
次のようにpipのバージョンが表示されれば成功です。
PS C:\Users\0x04> C:\Users\0x04\Downloads\blender-2.92.0-windows64\2.92\python\bin\python.exe -m pip --version
pip 19.2.3 from C:\Users\0x04\Downloads\blender-2.92.0-windows64\2.92\python\lib\site-packages\pip (python 3.7)
PS C:\Users\0x04>
続けて、pip自体のアップデートを行います。 次のコマンドを入力してください。
(snip)\python.exe -m pip install --upgrade pip
出力が下記2つのどちらかになっていれば成功です。
※実行時のPathなど一部の情報はユーザごとに異なります
# アップデートが成功した場合
PS C:\Users\0x04> C:\Users\0x04\Downloads\blender-2.92.0-windows64\2.92\python\bin\python.exe -m pip install --upgrade pip
Collecting pip
  Using cached https://files.pythonhosted.org/packages/a4/6d/6463d49a933f547439d6b5b98b46af8742cc03ae83543e4d7688c2420f8b/pip-21.3.1-py3-none-any.whl
Installing collected packages: pip
  Found existing installation: pip 19.2.3
    Uninstalling pip-19.2.3:
      Successfully uninstalled pip-19.2.3
Successfully installed pip-21.3.1
PS C:\Users\0x04>
# コマンド実行前からpipのバージョンが最新だった場合
PS C:\Users\0x04> C:\Users\0x04\Downloads\blender-2.92.0-windows64\2.92\python\bin\python.exe -m pip install --upgrade pip
Requirement already satisfied: pip in c:\users\0x04\downloads\blender-2.92.0-windows64\2.92\python\lib\site-packages (21.3.1)
PS C:\Users\0x04>
4. モジュールのインストール
さて、Blenderアドオンの話を忘れかけてきた頃かもしれませんが準備作業はこれで最後です。
冒頭で軽く触れたとおり、Tesselate texture planeを利用するためにはOpenCVとTriangleが必要です。
Tesselate texture planeのReadmeではpip install <module name>でインストールするように案内がありますが、環境によってはBlenderが使用しているPythonでモジュールを認識しません。
pipをここまでの作業と同じように(snip)\python -m pipと読み替えてコマンドを実行してください。
後述の例と同じようにSuccessfully installed <module name>と表示されれば成功です。

# 実行するコマンド
(snip)\python.exe -m pip install opencv-python
(snip)\python.exe -m pip install triangle

# 筆者の環境で実行した際のログ
PS C:\Users\0x04> C:\Users\0x04\Downloads\blender-2.92.0-windows64\2.92\python\bin\python.exe -m pip install opencv-python
Collecting opencv-python
  Using cached opencv_python-4.5.5.62-cp36-abi3-win_amd64.whl (35.4 MB)
Requirement already satisfied: numpy>=1.14.5 in c:\users\0x04\downloads\blender-2.92.0-windows64\2.92\python\lib\site-packages (from opencv-python) (1.17.5)
Installing collected packages: opencv-python
Successfully installed opencv-python-4.5.5.62
PS C:\Users\0x04>

PS C:\Users\0x04> C:\Users\0x04\Downloads\blender-2.92.0-windows64\2.92\python\bin\python.exe -m pip install triangle
Collecting triangle
  Using cached triangle-20200424-cp37-cp37m-win_amd64.whl (1.4 MB)
Requirement already satisfied: numpy in c:\users\0x04\downloads\blender-2.92.0-windows64\2.92\python\lib\site-packages (from triangle) (1.17.5)
Installing collected packages: triangle
Successfully installed triangle-20200424
PS C:\Users\0x04>
もし、OpenCVのインストール中に下記のようなエラーが出た場合は(snip)\python.exe -m pip install wheelを実行してからリトライするか、
手順3のpipアップデートが正しく適用されているか確認してみてください。
PS C:\WINDOWS\system32> C:\Users\0x04\Downloads\blender-2.92.0-windows64\blender-2.92.0-windows64\2.92\python\bin\python.exe -m pip install opencv-python
Collecting opencv-python
  Using cached https://files.pythonhosted.org/packages/c4/e2/27a153e27b98410cf5a871096a8baf98dd642e6685d3ebe7abd9edc8d51a/opencv-python-4.5.5.62.tar.gz
  Installing build dependencies ... done
  Getting requirements to build wheel ... error
  ERROR: Command errored out with exit status 1:

(snip)
Tesselate texture plane インストール
お待たせしました、ようやくTesselate texture planeのインストール準備ができました。
ここからはTesselate texture planeのインストール方法についての説明になりますが、zip形式で配布されているBlenderアドオンを追加したことがある方はすでに本節の内容はご存知だと思いますので読み飛ばしていただいても問題ありません。
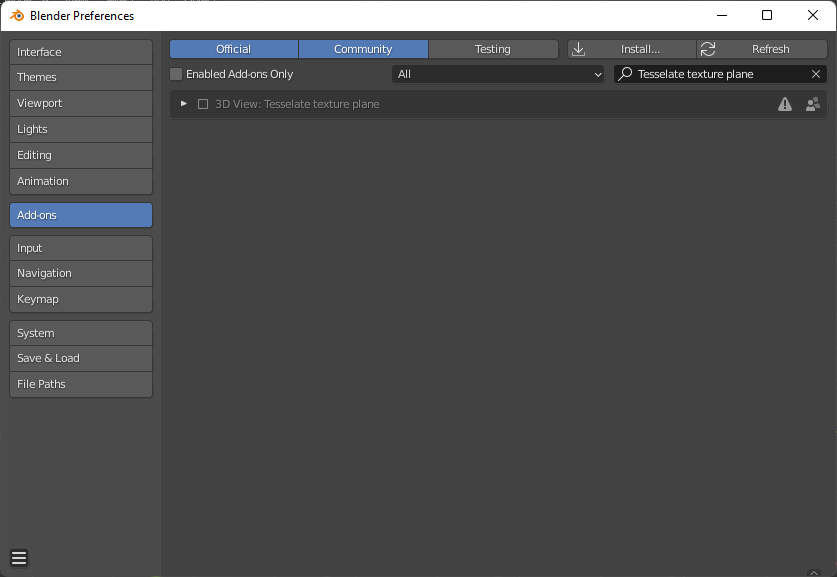
1. 設定画面を開く

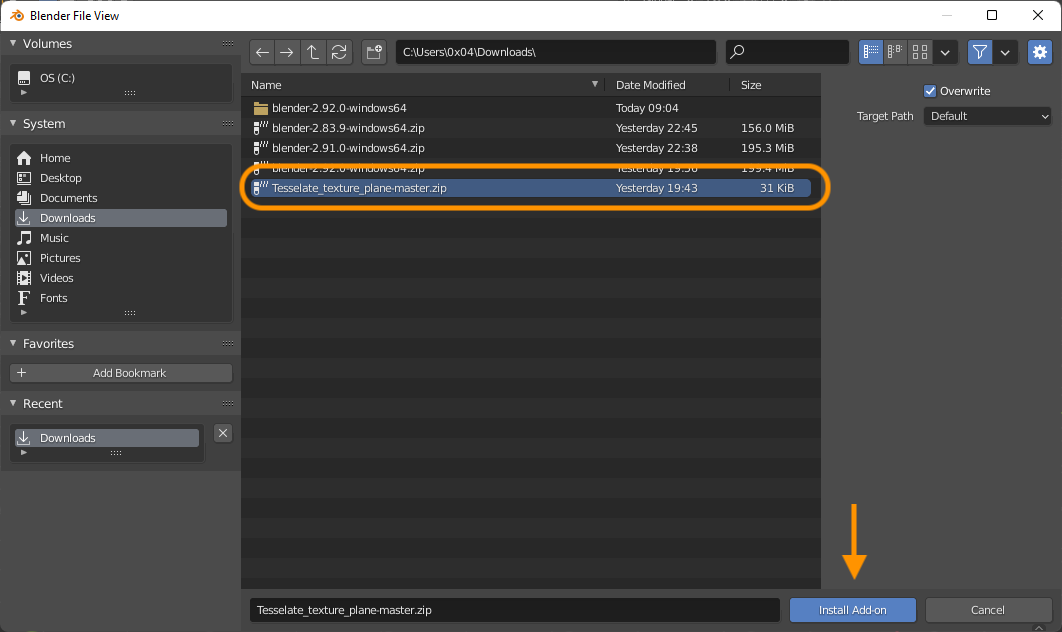
2. アドオンの追加
設定画面のAdd-onsタブを開き、画面上部のInstall an add-on.ボタンをクリックして準備の節でダウンロードしたTesselate texture planeのzipファイルを選択し、Install Add-onで追加できます。
3. アドオン有効化
アドオンを追加した後、チェックボックスをクリックすることで有効化されます。
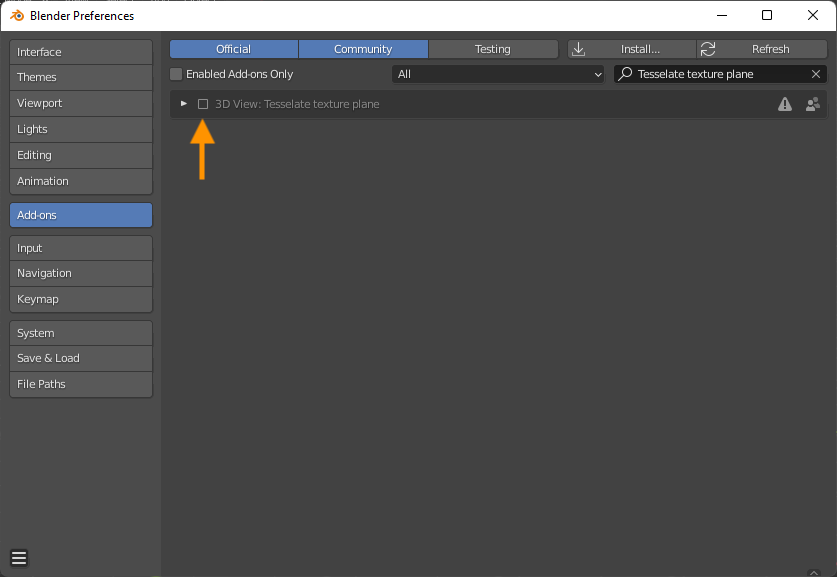
正しくインストールできている場合、Nキー >> Tool >> Tesselate texture planeから使用できます。
最後に
アドオンのWarning欄及びTesselate texture planeのReadmeに注意事項が記載されています。
警告に従い、Tesselate texture planeを利用する際にはこまめにセーブを行うことを推奨します。
Triangulating can crash with some images and settings (stable in “contour only” mode), be sure to save before use. If it crash on your image, try different settings.
