[Blender] mmd_tools_modの詳細

Blender上でMMDを扱う際に、UuuNyaa/blender_mmd_tools(以降、"mmd_tools"と表記)がよく利用されます。 本記事では、最近公開した(mmd_toolsのmod)[https://github.com/arch4e/mmd_tools_mod]についてどういった動作をするものなのか説明します。

不明点や要望等あれば、サイトトップのプロフィールにある各種SNSからご連絡ください。

ツールへのアクセス🔗

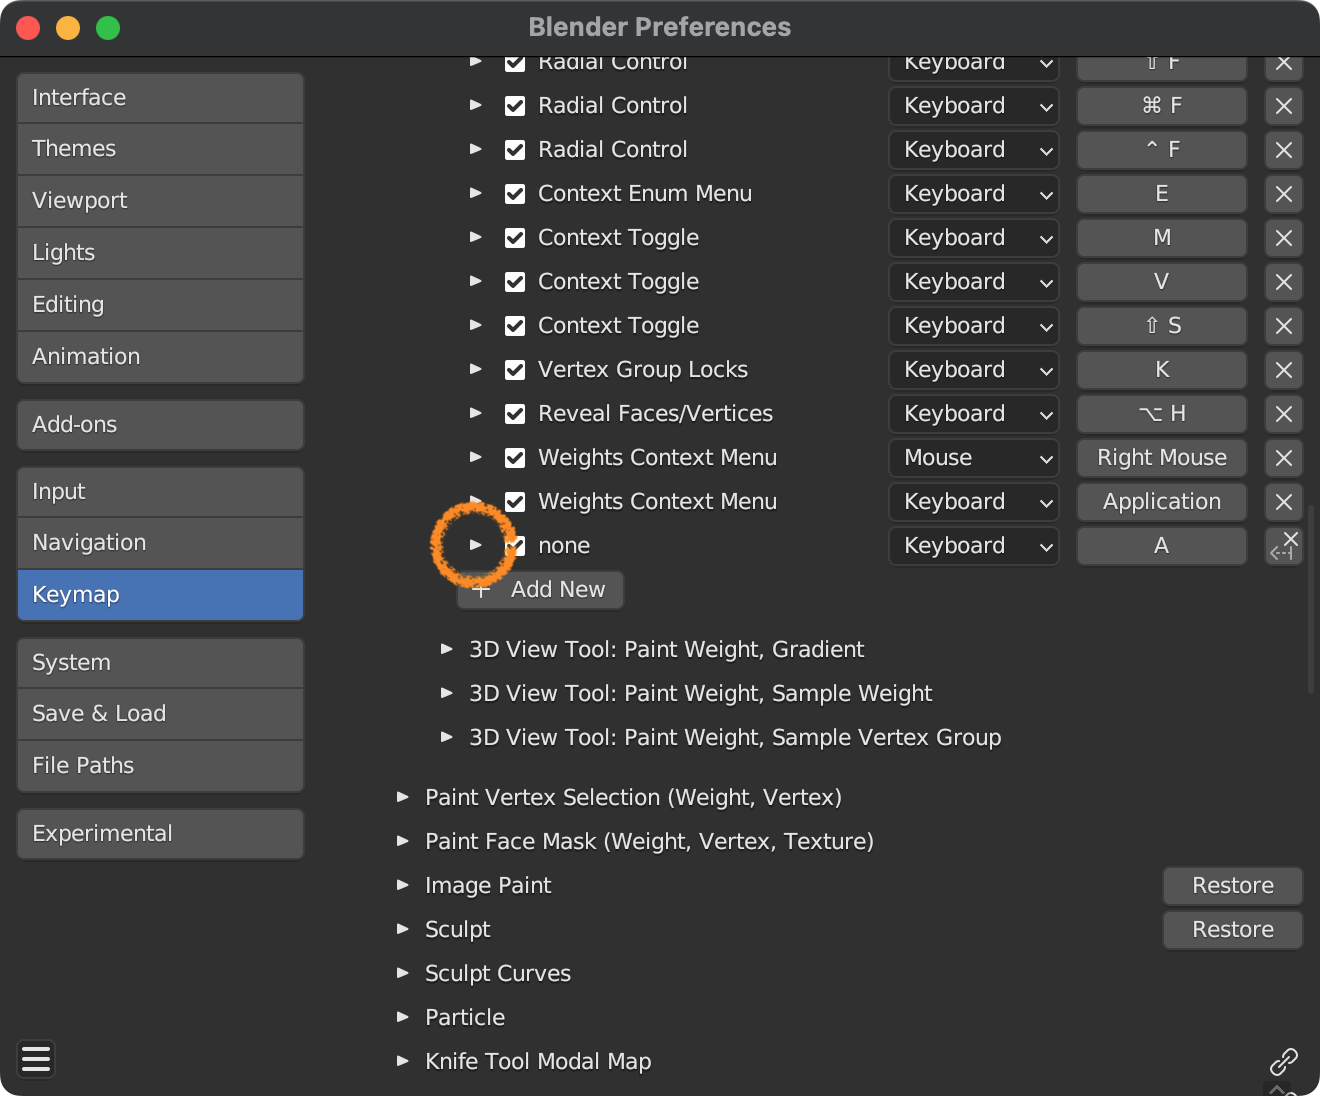
サイドバーの MMD を開くとmmd_toolsのパネルが並びますが、その中に Joints(Mod) パネルが追加されており、ここから操作を行います。 mmd_tools自体の Joints パネルには変更を加えていません。本ツールの導入によって元のツールへの上書きまたは追記をすることは避ける意図です。

v1.0.0における追加内容はJoint一覧の下に追加したJoint作成ボタンと同リスト横に追加したJoint名の重複解消ボタン、Jointソートボタンです。
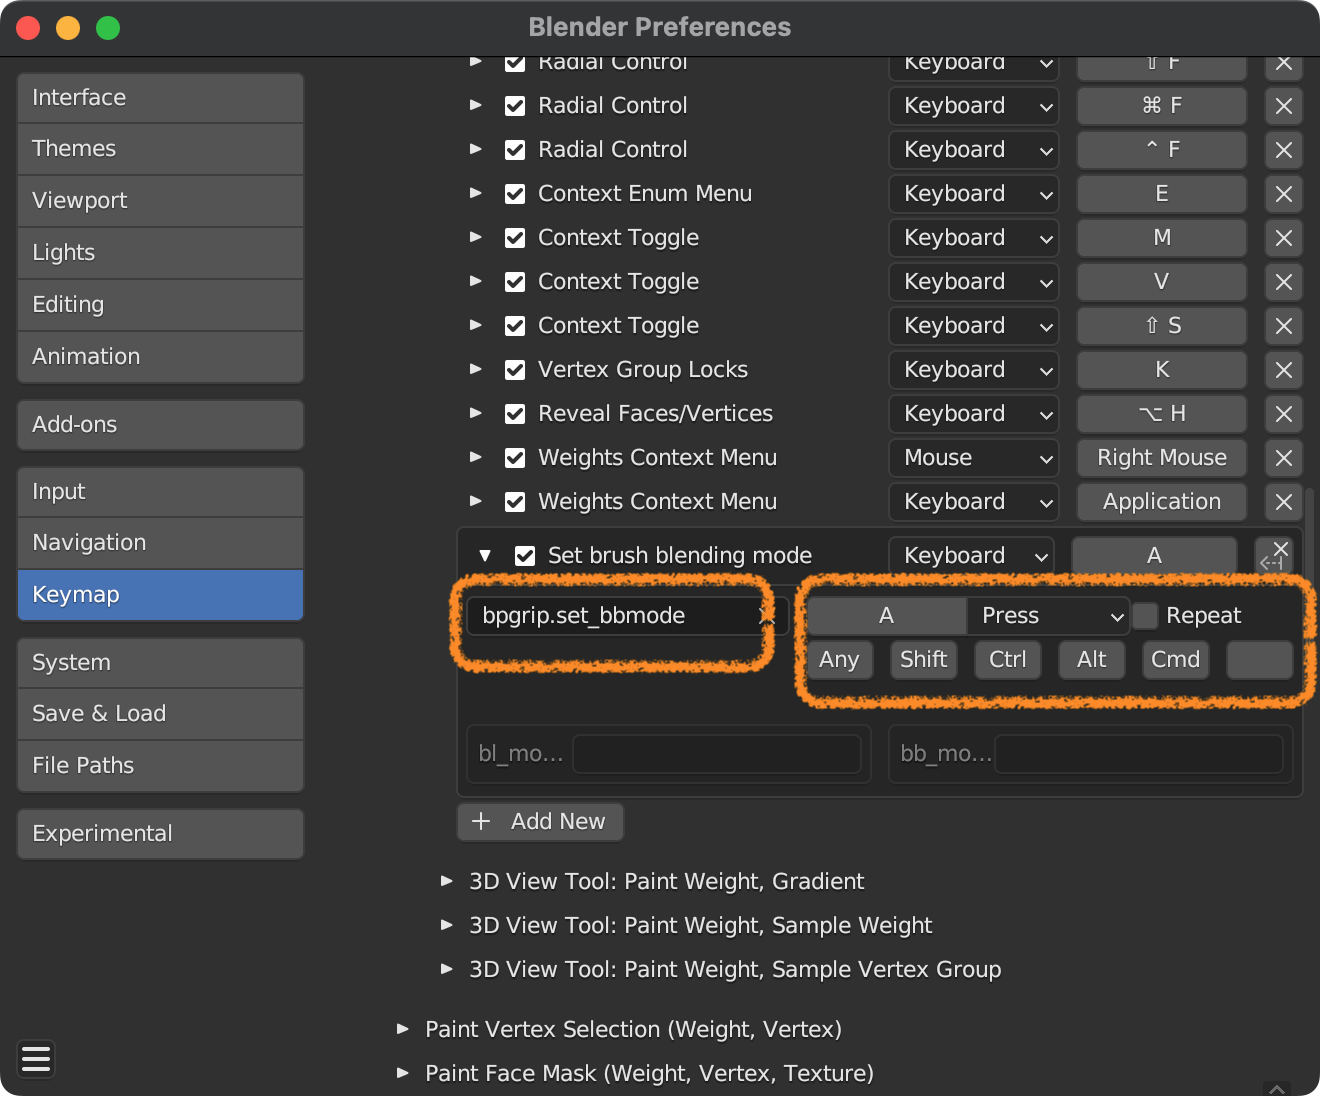
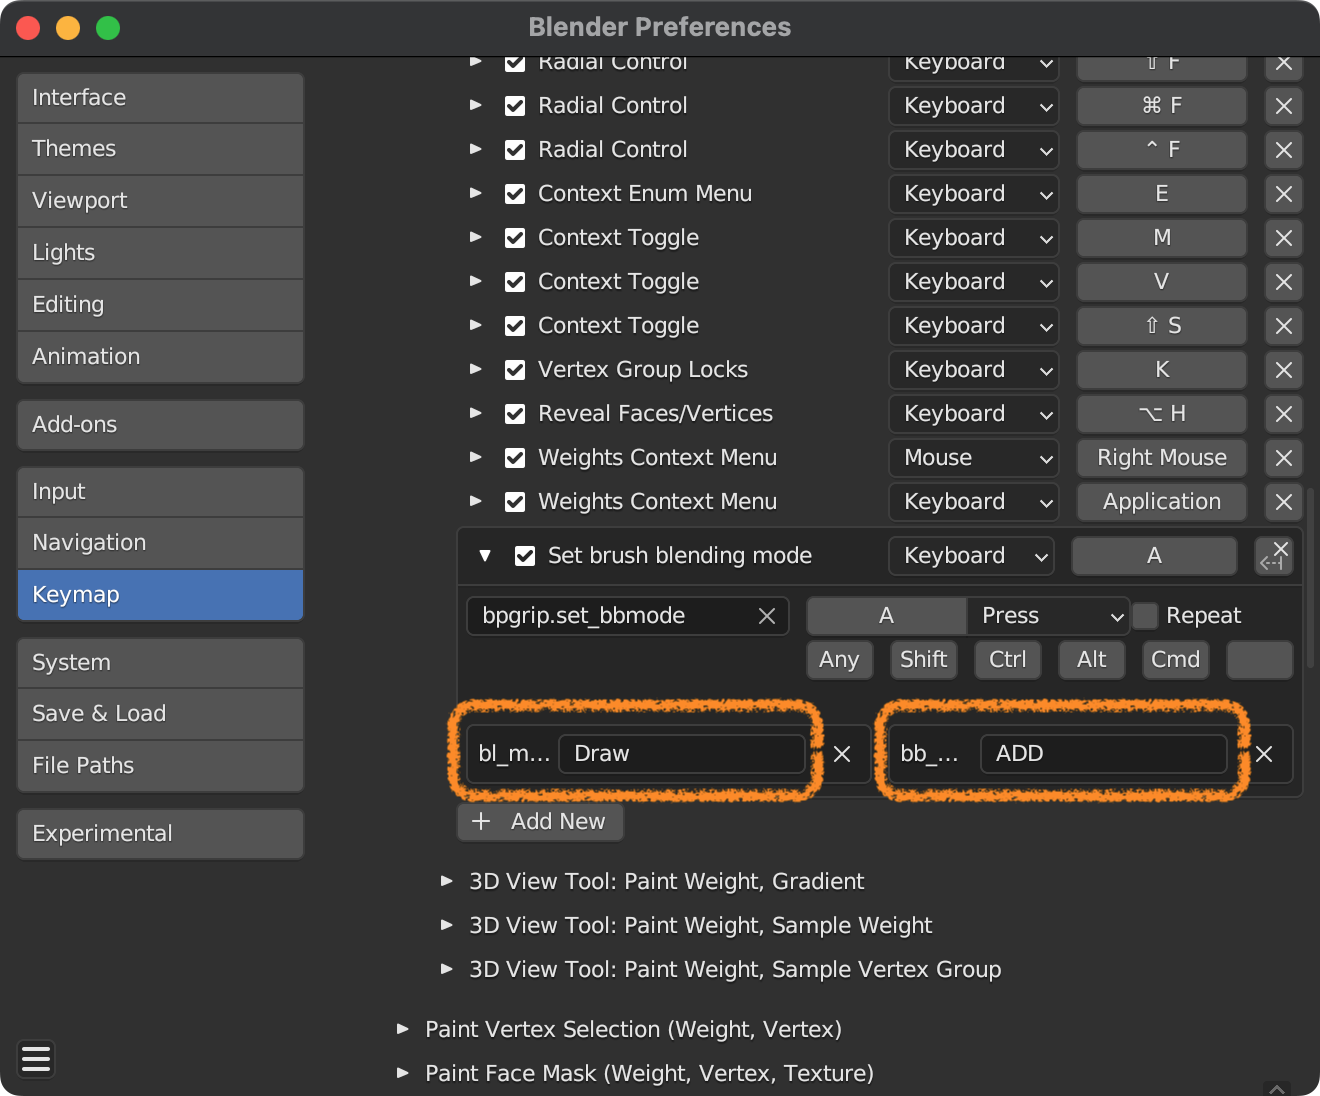
Joint作成🔗

mmd_toolsのJoint追加はリスト横の + ボタンから行いますが、名前が重複します。 重複解消は次節の機能で対処できますが、縦と横のJoint名を分けたい場合、リスト下にある Add Vertical Joint / Add Horizontal Joint を使用すると、Joint名に _V / _H というsuffixが付与されたJointが作成されます。

本家実装では + ボタンを押した際にポップアップウィンドウが表示されてパラメータを入力できますが、実装上の都合で本Modでは表示されません。

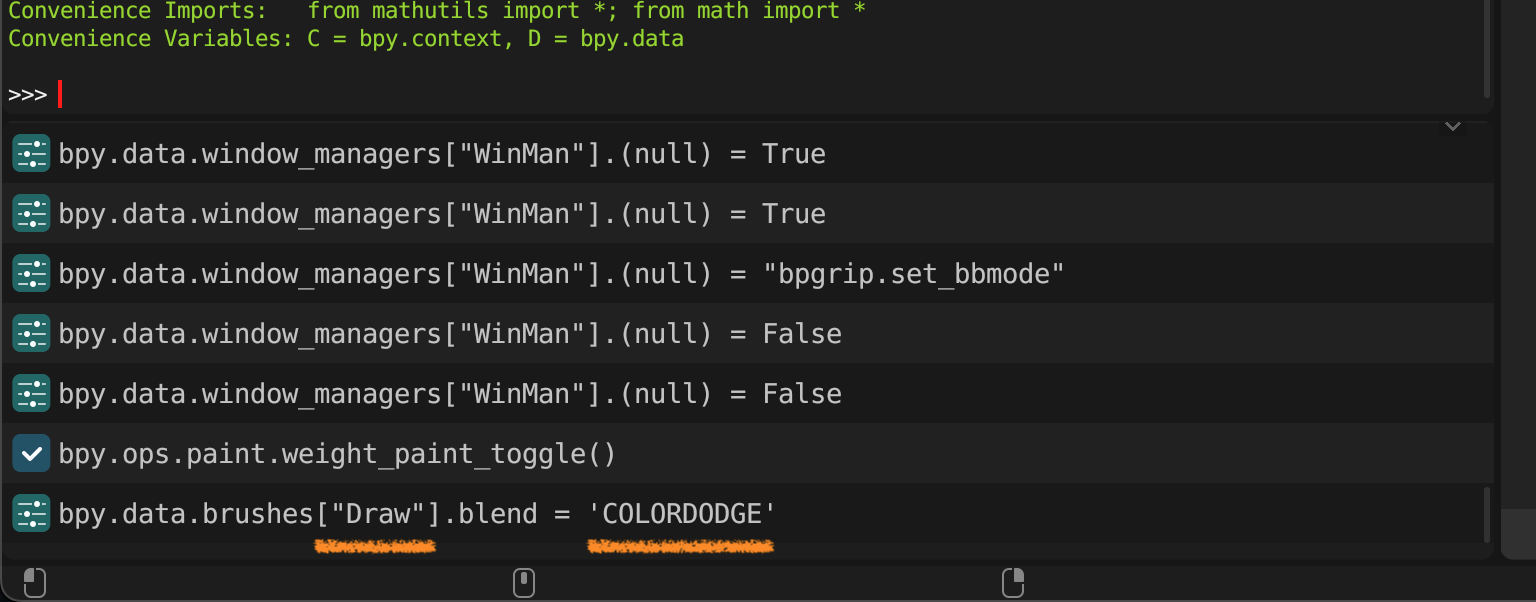
ボーンを3つ以上選択していた場合、名前順にJointを作成します。技術的な話になりますが、選択順にJointを作成するのが理想ではあるものの、bpy.context.selected_objects はアイテムが名前順に並んでおり、選択順の情報が取得できないためこのような動作になっています。(知見があれば連絡、p-rいただけるとありがたいです。)

Joint名 重複解消🔗

リスト横のリサイクルマークのようなボタンを押すと、Jointの名前をユニークなものに変更します。 具体的には、重複しているものがあれば名前の末尾に .001 のように数字を追加します。

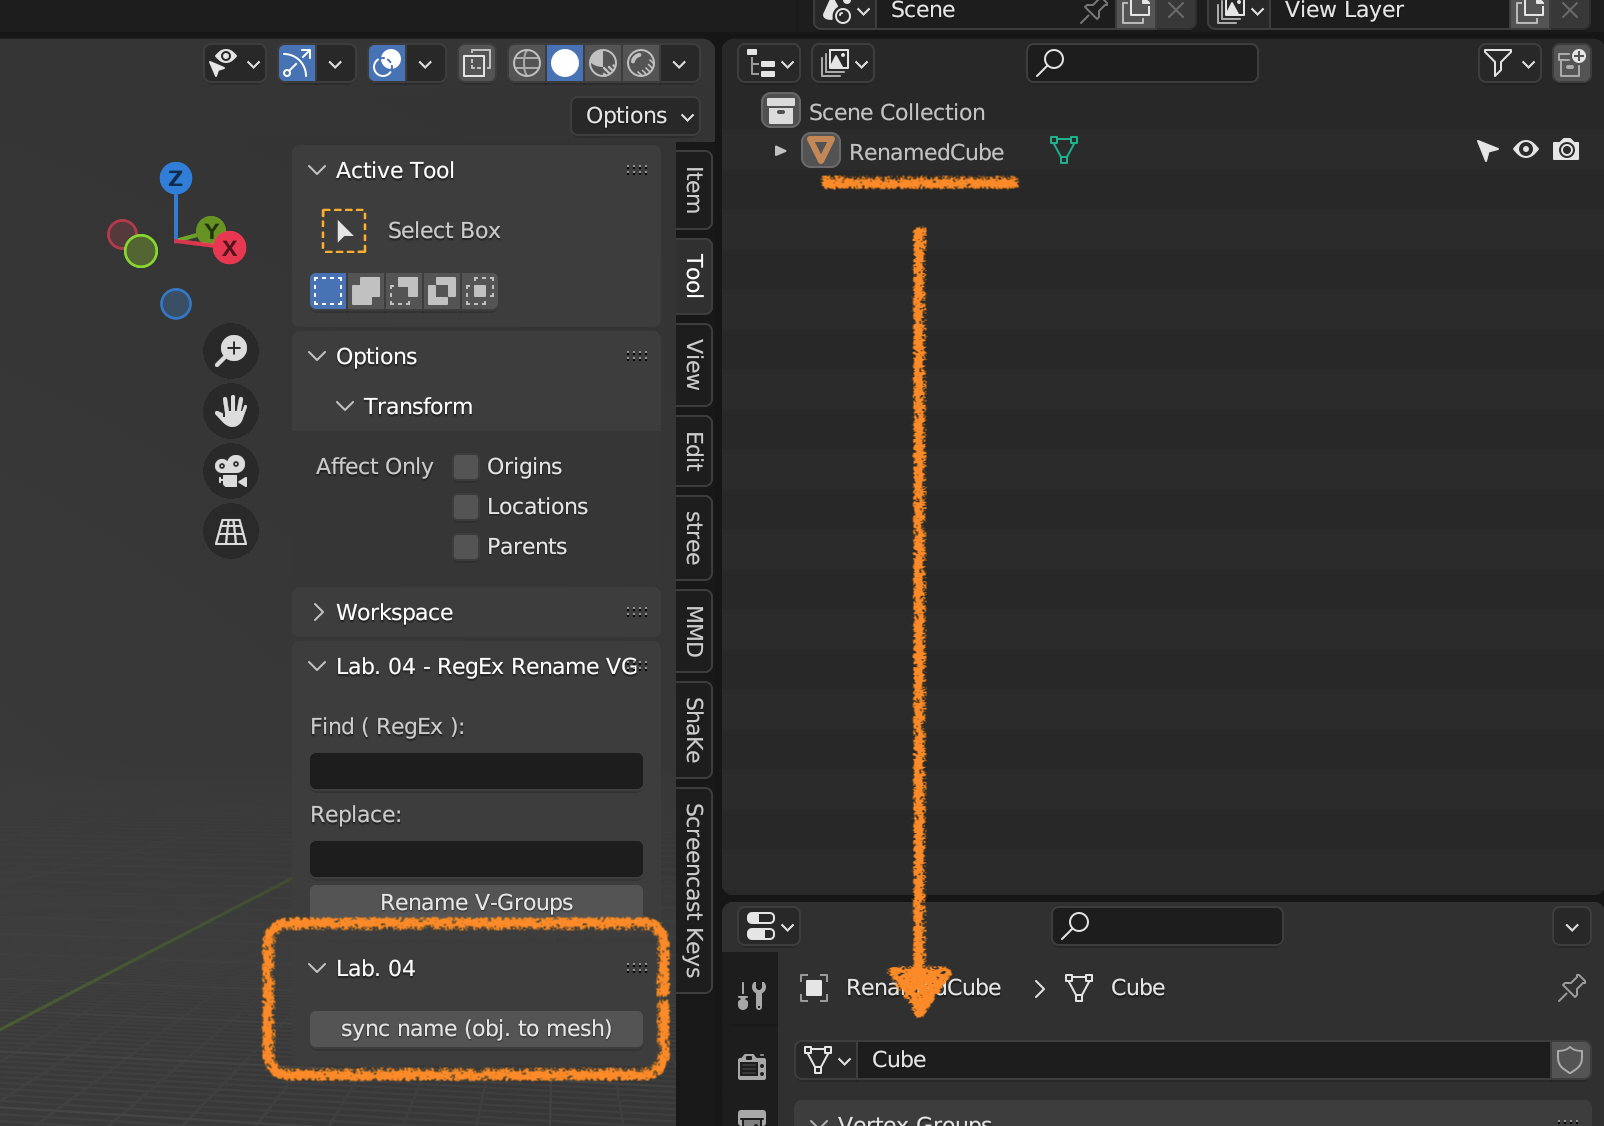
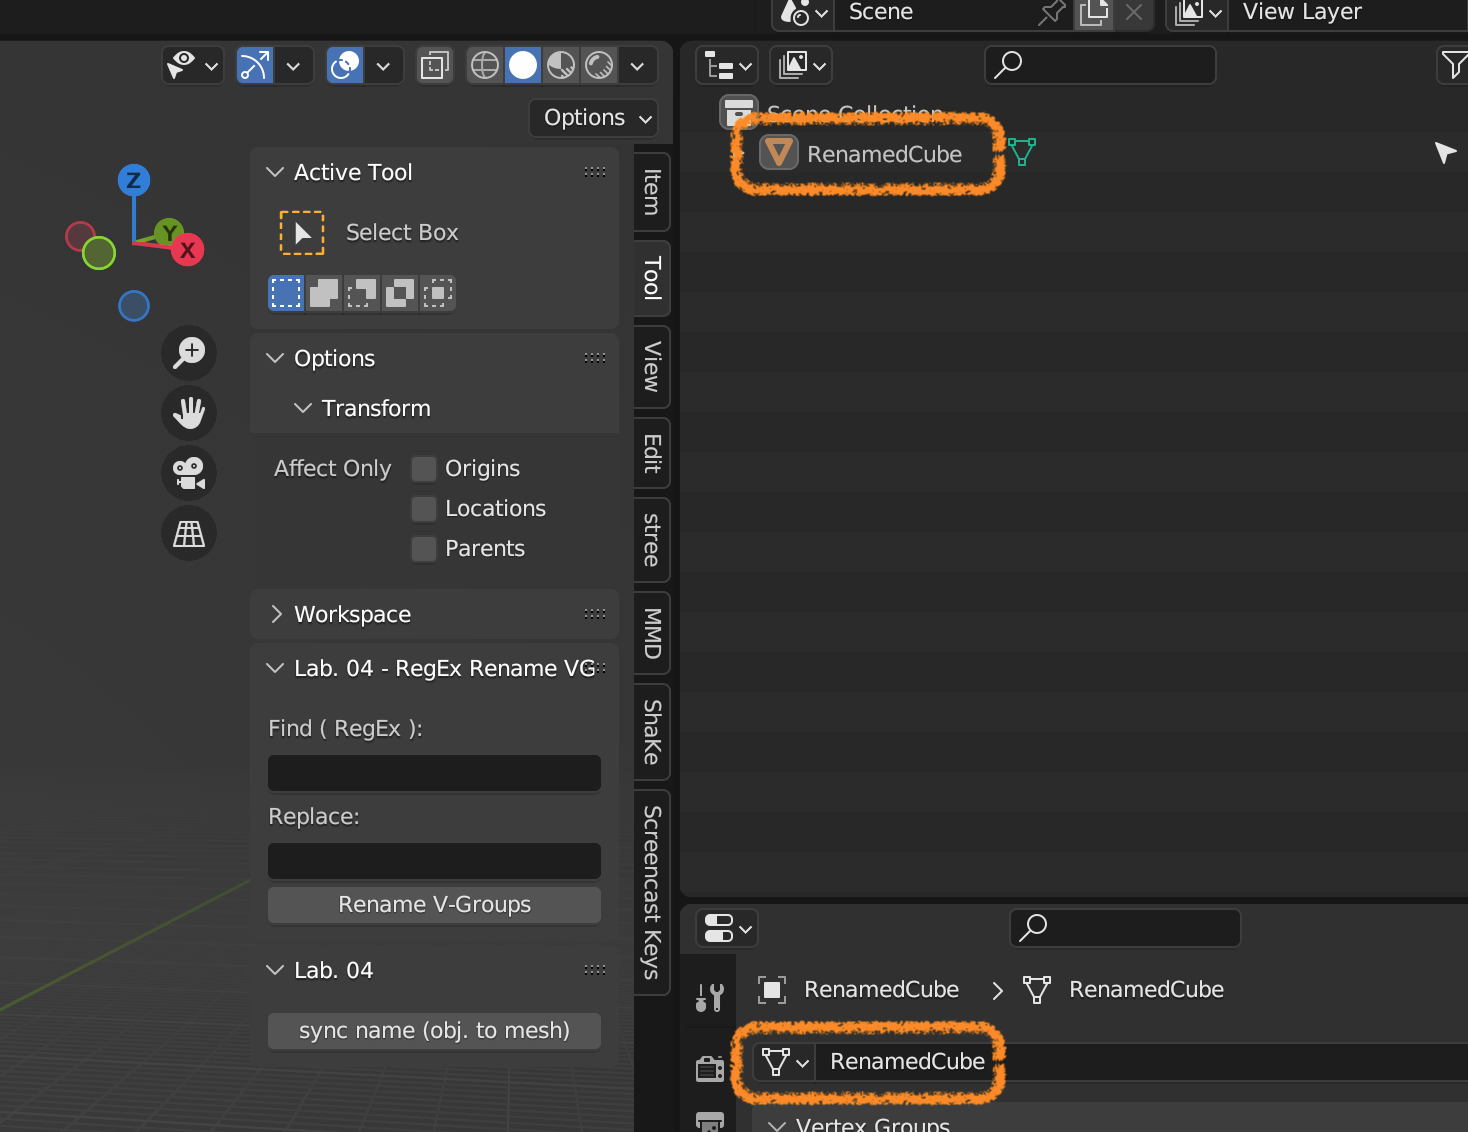
本機能を使用すると、Jointリスト上の名前とJointオブジェクト自体の名前が同期されるため、Outliner上の名前表示にも変化があります。

Joint名 ソート🔗

Jointリスト横のチェックマークボタンを押すとJointリストの順番がソートされます。このとき、Joint名が重複していると2つ目以降のJointは正しく並べ替えできないため、ソートされないJointがいる場合は前述の重複解消機能を利用して再実行してください。

また、本機能では外部モジュールの有無(ReadmeのOptionを参照)によって挙動が変わります。natsortモジュールがインストールされている場合はそれを使用し、読み込みに失敗した場合は標準モジュールを使用してソートを行います。動作の違いは2桁以上の数字の並べ替え時に現れ、下記の例のようにnatsort有りの方が自然なソートができます。

# natsort
1, 2, 3, ... , 10, 11, ...

# sort(python built-in)
1, 10, 11, ... , 2, 20, 21, ... , 3, ...

[Unity/VRM] VRM設定補助用Unity Editor拡張 使用方法

概要🔗

VRM 0.X系のセットアップ補助を目的としたUnity Editor拡張であるUtil4の試用方法を解説します。 問い合わせやツール作成のご依頼については記事末尾をご確認ください。

導入方法(汎用)🔗

  1. Assets フォルダ内に Editor フォルダを作成する
  2. GitHub等からファイルをダウンロードし、 Editor フォルダに配置する
  3. メニューの Tools から導入したツールのウィンドウを開く

使用方法🔗

Util4🔗

Download: GitHub

軽い気持ちでポンっと出したら想像以上にリアクションをいただいておりおどろいています。 機能が増えてきたらツール名を考え直すかもしれません……

主な機能🔗

  • モデルデータに存在するBlend Shapeを読み取り、Blend Shape Clipを自動作成する

使用方法🔗

動作検証: Unity 2021.3.32f1 / UniVRM v0.115.0 v0.1.1ではUnity 2019.4.31.f1&UniVRM v0.99.0でも動作することを確認しています。

デモ: https://x.com/arch4e_N/status/1736706173951496411

  1. 各フィールドにGame Objectをセットする
    • Avatar Prefab: Blend Shape Clipを作成するAvatarのPrefab
    • Source Mesh: Blend Shape Source オプションを Mesh にしている場合に使用する(詳細後述)
    • Blend Shape Object: Blend Shapeの管理オブジェクトらしきもの↓(変更していなければ BlendShapescreenshot
    • Save Folder: Blend Shape Clipの保存先
  2. Create Blend Shape Clips ボタンを押すとAvatarに存在するBlend Shapeと同じ名前でBlend Shape Clipが生成され、対応するBlend Shapeを100にする screenshot

オプション🔗

  • Source Mesh
    • Prefab: Prefabに存在するすべてのMeshで存在するBlend ShapeをClip作成対象とします
    • Mesh: 指定したMeshのみに存在するBlend ShapeをClip作成対象とします
  • Exist Blend Shape Clip
    • Skip: 同じ名前のBlend Shape Clipが作成済みの場合、読み飛ばして処理を進めます
    • Set Weight to 1: 同じ名前のBlend Shape Clipが作成済みかつBlend Shape未設定かWeightが0の場合、Weightを100にセットします
      • 0以外の値が設定されている場合、意図して編集したものとみなし変更を加えません

お問い合わせ、エディタ拡張作成・エラー対応のご依頼について🔗

リリース済みのツールに関するご質問は本ページトップに記載しているSNSにてご連絡ください。 有償でのツール作成も受け付けておりますので、ご希望の方は上記の方法にてご相談ください。

[Blender] arch4e's add-ons usage

Overview🔗

This article compiles the usage instructions for custom add-ons, detailing the operating environment for each add-on separately. As it may not be fully compatible with the latest release, please refer to GitHub release notes or similar sources for changes beyond the specified version.

For inquiries and tool creation requests, please check the end of the article.

Add-on Usage🔗

bpgrip🔗

Download: GitHub / Booth

Main Features🔗

  • Register keyboard shortcuts for switching blending modes of brush-type tools

Usage (Assuming Weight Paint Mode)🔗

Tested on: bpgrip v2.0 / Blender 3.6.5 It should also work on Blender 4.0, the latest version at the time of writing.

  1. Go to Edit >> Preferences from the top left of the screen and navigate to Keymap. screenshot
  2. Scroll down a bit and go to 3D View >> Weight Paint >> Weight Paint (Global) (※1). screenshot
  3. Press Add New , then press the triangle icon. screenshot
  4. Change the entry that says none to bpgrip.set_bbmode , and assign the keyboard shortcut. screenshot
  5. Set the bl_mode to Draw (※2) and the bb_mode to the tool you want to assign the shortcut (※3). screenshot
  6. With these steps, you can switch Brush Blending Modes using the keyboard shortcut.
※1,2: For brush tools in Sculpt Mode and similar, refer to the "Keymap" section in the "readme.md" on GitHub.
       https://github.com/arch4e/bpgrip
※3: Basic tool names are usually straightforward, such as "Add" for the "ADD" brush. You can also check from the Inspector at the bottom left of Blender's "Scripting" tab, which shows the operation log. Also, the `bl_mode` in ※2 can be confirmed in a similar log.
screenshot

lab04🔗

Download: GitHub

Main Features🔗

※Implements various small functions not substantial enough to be a separate add-on, and relatively frequently conducts feature integration and removal.

  • Match mesh names with object names
  • Rename vertex groups in bulk (with regular expression)
  • Toggle UV Sync Selection , allowing other UV maps to remain visible while disabled
  • Assist in assigning weights to vertex groups
  • Perform simple tasks by instructing ChatGPT (joke feature) Deprecated in v0.5.0

Usage🔗

Tested on: bpgrip v2.0 / Blender 3.6.5, 4.0.0

Match Mesh Names with Object Names🔗
  1. 3D Viewの右にある Tool エリアから Lab. 04 パネルを開く
  2. sync name (obj. to mesh) ボタンを押すと全てのメッシュの名前がObjectの名前で上書きされる
  3. Open the Lab. 04 panel from the Tool area on the right side of the 3D View.
  4. Press the sync name (obj. to mesh) button to overwrite all mesh names with object names.
screenshot screenshot
Rename Vertex Groups in Bulk (with Regular Expression)🔗
  1. Select and make active the object you want to operate on.
  2. Enter the search pattern and replacement string, then press Rename V-Groups .
    • The pattern is interpreted as a regular expression, so you can use it to add a prefix by specifying ^ (meaning "start of line" in regular expressions).
screenshot screenshot
Toggle UV Sync Selection , Allowing Other UV Maps to Remain Visible While Disabled🔗
screenshot
  1. Go to Edit >> Preferences from the top left of the screen and navigate to Keymap .
  2. Scroll down a bit and go to Image >> UV Editor >> UV Editor (Global) . screenshot
  3. Similar to bpgrip, assign a keyboard shortcut to lab04.switch_uv_select_sync using Add New . screenshot
  4. Execute the set keyboard shortcut in the UV Editing tab to toggle UV Sync Selection .
Assist in Assigning Weights to Vertex Groups🔗

A panel for assigning weights to vertex groups appears in the Item area. Although it's essentially the same as the default functionality, it allows specifying weight values with the mouse cursor. Note that the application of weights is triggered when the Assign button is pressed.

screenshot

shake🔗

Download: GitHub / Booth

Main Features🔗

  • Create Shape Keys from CSV
  • Move active Shape Key to any position on the list
  • Align based on Prefix (based on runtime order, not AtoZ)
  • Sort by Prefix
  • Transcribe Shape Keys

Usage🔗

Tested on: bpgrip v2.0 / Blender 3.6.5, 4.0.0

Create Shape Keys from CSV🔗
  1. Load a list of Shape Keys you want to create in your Blender project from CSV.
  2. Delimiters: line break (LF or CR+LF) and , .
    • You can also create them from the Scripting Tab.
  3. Open Create Shape Keys from CSV in the ShaKe area of the 3D View.
  4. Select the CSV file from the dropdown menu.
  5. Choose the object to create Shape Keys for and press create shape keys from csv .
screenshot screenshot
Move active Shape Key to any position on the list🔗
  1. Select an object and make it active.
  2. Choose the Shape Key you want to move and hover over Move Shape Key in the right-click menu.
  3. The active Shape Key will move below the selected one in the list.
screenshot
Align based on Prefix (based on runtime order, not AtoZ)🔗
  1. Select an object and make it active.
  2. Press Align by Prefix in the right-click menu to sort by each prefix.
    • It sorts based on the order of prefix existence, not AtoZ.
screenshot
Sort by Prefix🔗
  1. Open Order Management in the ShaKe area of the 3D View .
  2. Create a list of prefixes from the panel's right button.
    • Click the arrow icon to automatically retrieve information from the active object (be careful, as it overwrites).
    • Manual creation is also possible with the + icon.
    • Supports multi-level prefixes like MAIN_sub_ , determined by the longest match from the beginning.
  3. Press Rearrange, and Shape Keys will be sorted according to the list order.
    • Since it looks for a match from the beginning, the delimiter ( _ ) is not mandatory.
      • Example: K matches Key~ .
screenshot
Transcribe Shape Keys🔗
  1. Open Shape Keys Selector and Transcribe Shape Keys in the ShaKe area of the 3D View.
  2. In Shape Keys Selector , choose the Shape Keys you want to transcribe from either the project or the selected object.
  3. In Transcribe Shape Keys , select the object where you want to transcribe (create) the Shape Keys.
  4. Press transcribe , and the selected object will have the corresponding Shape Keys created.
screenshot

stree🔗

Download: GitHub / Booth

Main Features🔗

  • Backup objects to a separate collection
  • Easily preview and restore backups

Usage🔗

Not specified, as it is not intended for general use.

Inquiries and Requests for Addon Creation and Error Support🔗

For questions about released addons, requests for addon creation, and consultations regarding technical support (such as hearing about errors in other addons or creating simple patches), please contact the SNS listed at the top of this page. Please also provide details about the addon or budget for addon creation and technical support.

[Blender] 自作アドオンの使用方法説明

概要🔗

If you find English easier to understand, please check the English version. Translation is done using GPT-3, and while efforts are made for accuracy, there may be some inaccuracies.

自作アドオンの使用方法をまとめます。 動作環境などはそれぞれのアドオンごとに記載します。 最新リリースに完全対応できているわけではないため、記載バージョン以降の変更はGitHubのリリースノート等をご参照ください。

問い合わせやツール作成のご依頼については記事末尾をご確認ください。

アドオン使用方法🔗

bpgrip🔗

Download: GitHub / Booth

主な機能🔗

  • ブラシ系ツールのBlending Mode切り替えをキーボードショートカットに登録できる

使用方法(Weight Paint Modeを想定)🔗

動作検証: bpgrip v2.0 / Blender 3.6.5 記事執筆時点の最新版であるBlender 4.0でも動くと思います。

  1. 画面左上の Edit >> Preference から Keymap に移動 screenshot
  2. 少し下にスクロールし、 3D View >> Weight Paint >> Weight Paint (Global) (※1)へ移動 screenshot
  3. Add New を押し、三角のマークを押す screenshot
  4. none となっている箇所を bpgrip.set_bbmode に変更し、キーボードショートカットの割り当てを行う screenshot
  5. bl_mode の項目を Draw (※2)に、 bb_mode の項目をショートカット登録したいツール(※3)にする screenshot
  6. 以上で、キーボードショートカットからBrush Blending Modeを切り替え可能になる
※1,2: Sculpt ModeのブラシなどはGitHubの"readme.md"にある"Keymap"の項目を参照してください。
       https://github.com/arch4e/bpgrip
※3: "Add"ブラシは"ADD"など、基本的には名前の通りですが、Blenderの"Scripting"タブの左下にあるインスペクタに表示される操作ログからも確認できます。
     また、※2のbl_modeも同様のログから確認可能です。
screenshot

lab04🔗

Download: GitHub

主な機能🔗

※一つのアドオンにするほどでもない、細かな機能を実装しているアドオンのため比較的頻繁に機能の統廃合を行っている

  • Mesh名をObject名と一致させる
  • 頂点グループの一括リネームを行う(正規表現指定)
  • UV Sync Selection の切り替えにおいて、選択頂点以外のUV Mapも表示されたまま無効化できる
  • 頂点グループへのWeight割り当て補助
  • ChatGPTへ指示することで簡単な作業を行う(ネタ機能) v0.5.0にて廃止

使用方法🔗

Mesh名をObject名と一致させる🔗
  1. 3D Viewの右にある Tool エリアから Lab. 04 パネルを開く
  2. sync name (obj. to mesh) ボタンを押すと全てのメッシュの名前がObjectの名前で上書きされる
screenshot screenshot
頂点グループの一括リネームを行う(正規表現指定)🔗
  1. Objectを選択し、アクティブにしておく
  2. 検索パターンと置換後の文字列を入力し、 Rename V-Groups を押す
    • パターンは正規表現で解釈されるため、 ^ (正規表現において"行頭"を意味する)を指定してPrefixを付与するといった使い方もできる
screenshot screenshot
UV Sync Selection の切り替えにおいて、選択頂点以外のUV Mapも表示されたまま無効化できる🔗
screenshot
  1. 画面左上の Edit >> Preference から Keymap に移動
  2. 少し下にスクロールし、 Image >> UV Editor >> UV Editor (Global) に移動 screenshot
  3. 前述の bpgrip と同様に Add New から lab04.switch_uv_select_sync にキーボードショートカットを割り当てる screenshot
  4. UV Editing タブで設定したキーボードショートカットを実行するとUV Sync Selectionが切り替わる
頂点グループへのWeight割り当て補助🔗

Item エリアに頂点グループ割当用のパネルが表示される。 基本的にはデフォルトの機能と同じだが、Weightの値をマウスカーソルで指定可能になっている。 ※連続実行を想定して、Weightの適用は Assign ボタンを押したタイミングに行う仕様にしている

screenshot

shake🔗

Download: GitHub / Booth

主な機能🔗

  • CSVからShape Keysを作成
  • アクティブなShape Keyをリスト上の任意の位置へ移動
  • Prefixを参照して整列(AtoZではなく実行時点の並び順を基準にする)
  • Prefix単位の並べ替え
  • Shape Keysの転写

使用方法🔗

CSVからShape Keysを作成🔗
  1. Blender Projectに作成したいShape Keysの一覧を読み込む
    • 区切り文字は 改行(LF or CR+LF),
    • Scripting Tabから作成しても良い
  2. 3D Viewの ShaKe エリアにある Create Shape Keys from CSV を開く
  3. プルダウンメニューからCSVファイルを選択する screenshot
  4. Shape Keysを作成するObjectを選択し、 create shape key from csv を押すとShape Keysが作成される
screenshot screenshot
アクティブなShape Keyをリスト上の任意の位置へ移動🔗
  1. Objectを選択し、アクティブにしておく
  2. 移動させたいShape Keyを選択し、右のメニューから Move Shape Key にマウスカーソルを合わせる
  3. リストで選んだShape Keyの下にアクティブなShape Keyが移動する
screenshot
Prefixを参照して整列(AtoZではなく実行時点の並び順を基準にする)🔗
  1. Objectを選択し、アクティブにしておく
  2. 右のメニューから Align by Prefix を押すとPrefixごとに並べ替える
    • AtoZではなく、Prefixが存在する順番で上に詰める動作をする
screenshot
Prefix単位の並べ替え🔗
  1. 3D Viewの ShaKe エリアにある Order Management を開く
  2. パネル右のボタンからPrefixのリストを作成する
    • 矢印のアイコンをクリックするとアクティブなObjectから自動で情報を取得する(上書きのため注意)
    • + アイコンで手動作成も可能
    • MAIN_sub_ のように多段になっていてもよい
      • 並べ替えの際は頭からの最長一致で判定される
  3. Rearrange ボタンを押すとリストの順番でShape Keysが整列される
    • 先頭からの一致を見ているため、区切り文字( _ )は必須でない
      • 例: K なら Key~ にもマッチする
    • リストのどれにもマッチしないShape Keyはスキップされる
screenshot
Shape Keysの転写🔗
  1. 3D Viewの ShaKe エリアにある Shape Keys Selector , Transcribe Shape Keys を開く
  2. Shape Keys Selector でプロジェクトか、選択したObjectに存在するShape Keysのうち、他Objectにも作成したいものを選択する
    • 日本語UIで設定の インターフェイス >> 新規データ にチェックが入っている場合、Object指定のオプションは存在しない
      • 日本語を含む(正確にはNon-ASCII)場合に正常に処理されないため
  3. Transcribe Shape Keys でShape Keysを転写(作成)したいObjectを選択する
  4. transcribe を押すと選択したObjectに対象のShape Keysが作成される
screenshot

stree🔗

Download: GitHub / Booth

主な機能🔗

  • Objectを別コレクションにバックアップする
  • バックアップのプレビュー・復元を簡単に行う

使用方法🔗

不特定多数の利用を想定していないため省略

お問い合わせ、アドオン作成・エラー対応のご依頼について🔗

リリース済みアドオンに関するご質問や、アドオン作成の制作依頼、技術支援(他アドオンのエラーに関するヒアリング・簡単なパッチ作成など)のご相談は本ページトップに記載しているSNSにてご連絡ください。 アドオン作成や技術支援については対象のアドオンや予算等も併せてご提示ください。

[Blender] アドオン開発個人メモ

Blenderアドオン開発に関する個人的なメモです。 気になる箇所があればトップページに記載しているSNS等でご指摘ください。

命名規則🔗

基本的にPEP8に従うが、クラス名など一部の命名は完全準拠というわけではなさそう。 PEP8のA Foolish Consistency is the Hobgoblin of Little Mindsに次の一文があるため、Blenderのお作法に合わせるのが適切と判断した。

In particular: do not break backwards compatibility just to comply with this PEP!

クラス🔗

標準アドオンのコードやperplexityを用いた検索結果から次の規則で命名することにした。 Property Groupは HT , MT のようなキーワードが見つからず、Blender Python APIのexamplesでは MyPropertyGroup となっている。 しかし、以下の理由から PG をキーワードとして使用することにした。

  • Property GroupだけPrefixが存在しない場合、register/unregisterの対象とすべきクラスとそうでないクラスが名前から判別できない
  • 適切な命名規則がわかった時に置換すべきクラスを見つけやすい
  • 上記のメリットとBlenderのお作法から外れることを天秤にかけたとき、前者を重要視した

その他、 register 実行時にBlenderコンソールに出力されるwarningも考慮している。

# Header: HT
class <ADDON_NAME>_HT_<header>_<name>(bpy.types.Header):
    bl_idname = '<ADDON_NAME>_HT_<header>_<name>'
    # example: https://docs.blender.org/api/current/bpy.types.Header.html

# Menu: MT
class <ADDON_NAME>_MT_<menu>_<name>(bpy.types.Menu):
    bl_idname = '<ADDON_NAME>_MT_<menu>_<name>'
    # example: https://docs.blender.org/api/current/bpy.types.Menu.html

# Operator: OT
class <ADDON_NAME>_OT_<operator>_<name>(bpy.types.Operator):
    bl_idname = '<ADDON_NAME>.<operator>_<name>'
    # example: https://docs.blender.org/api/current/bpy.types.Operator.html

# Panel: PT
class <ADDON_NAME>_PT_<panel>_<name>(bpy.types.Panel):
    bl_idname = 'VIEW3D_PT_<ADDON_NAME>_<panel>_<name>'
    # example: https://docs.blender.org/api/current/bpy.types.Panel.html

# UI List: UL
class UI_UL_<ADDON_NAME>_<ui>_<list>_<name>(bpy.types.UIList):
    # example: https://docs.blender.org/api/current/bpy.types.UIList.html

# Property Group: PG
class <ADDON_NAME>_PG_<property>_<group>_<name>():
    # example: https://docs.blender.org/api/current/bpy.types.PropertyGroup.html

ファイル分割🔗

operator , property , ui で分割している。 __init__.py でクラスを登録していくが、その順番がパネルの表示順になるようだ。